
Accessing the admin page
Go to Apps → Manage your apps in the Jira top navigation. In the left sidebar, find the Hierarchies section.
The admin page has three sections:
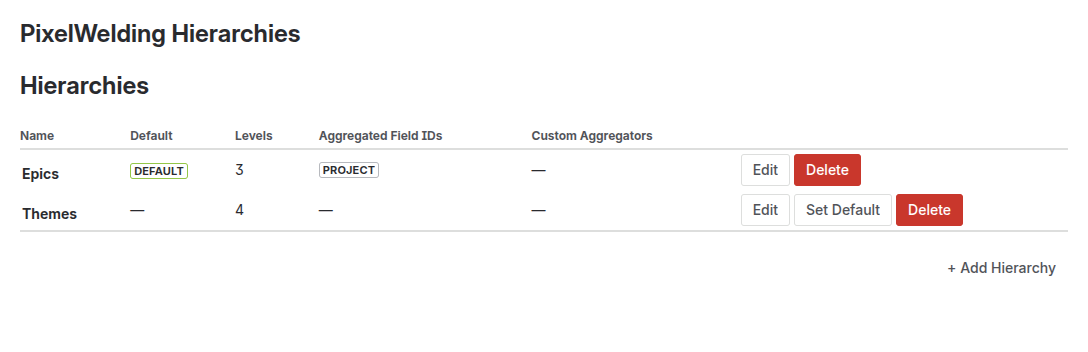
- Hierarchies — Create, rename, and delete hierarchy configurations. Set a default and drill into level editing.
- Custom Aggregators — Define custom Jira expressions that compute values across child issues.
- Sync — Trigger and monitor a full re-sync of all hierarchy properties.
Understanding hierarchies
A hierarchy defines how issues in your Jira projects relate to each other in a parent-child tree. Each hierarchy is made up of levels — ordered tiers where each level represents a class of issues (e.g. Epic, Story, Sub-task).
Level properties
Each level in a hierarchy has these attributes:
| Property | Description |
|---|---|
| Order | Position in the hierarchy. order=0 is the lowest/leaf level (bottom of the tree). Higher values are container/parent levels. |
| Operative | Whether issues at this level participate in the hierarchy. If unchecked, issues at this level are ignored. |
| Container | Whether issues at this level can have children. Container levels aggregate data from their descendants. |
| Field | The Jira field that establishes the parent-child relationship. Use parent for sub-tasks, or a custom field for other link types. |
| Link | The Jira issue link type that connects levels. For example, “blocks” or “relates to”. |
| Link Direction | Whether the child issue holds the outward or inward link descriptor. |
| Issue Types | The Jira issue types that belong to this level (e.g. Epic, Story, Task, Sub-task). |
How levels chain together
Consider a classic Epic → Story → Sub-task hierarchy:
Level 2 (order=2): Epic       — container, linked to Stories via "parent" field
Level 1 (order=1): Story      — container (for sub-tasks), operative, linked above via "parent"
Level 0 (order=0): Sub-task   — operative, linked above via "parent" field
The Field or Link on a level determines how it connects to the level above. When using the built-in parent field (Jira’s sub-task parent), only one level can use it — typically the lowest level. Upper levels use issue links.
Warning
Avoid creating recursive hierarchies where an issue can become its own ancestor through a chain of links. For example, don’t configure a level where Epics link to Stories and Stories link back to Epics using the same field — this creates circular references that break the tree view.
Hierarchy examples
Here are common hierarchy patterns and how to configure them:
Classic Epic → Story → Sub-task
Level 2 (order=2): Epic       — container, field: none (top level)
Level 1 (order=1): Story      — container, field: parent, issue types: Story
Level 0 (order=0): Sub-task   — operative, field: parent, issue types: Sub-task
OKRs (Objectives and Key Results)
Level 1 (order=1): Objective  — container, link: "relates to" (outward)
Level 0 (order=0): Key Result — operative, field: parent
Sprint Planning
Level 2 (order=2): Sprint     — container, link: "blocks" (inward)
Level 1 (order=1): Story      — container, field: parent
Level 0 (order=0): Sub-task   — operative, field: parent
Requirements traceability
Level 2 (order=2): Requirement — container, link: "implements" (outward)
Level 1 (order=1): Task        — operative, link: "implements" (inward)
Creating a hierarchy
- On the admin page, click + Add Hierarchy
- Enter a name and optionally check Set as default (the default hierarchy is pre-selected in the tree view)
- Click the checkmark to create
- Click Edit on the new hierarchy to define its structure
Editing a hierarchy
The hierarchy editor page lets you configure all aspects of a hierarchy: levels, aggregated fields, and custom aggregators.
Levels
The levels editor shows levels in visual order — highest (most container) at the top, lowest (leaf) at the bottom. You can drag rows to reorder.
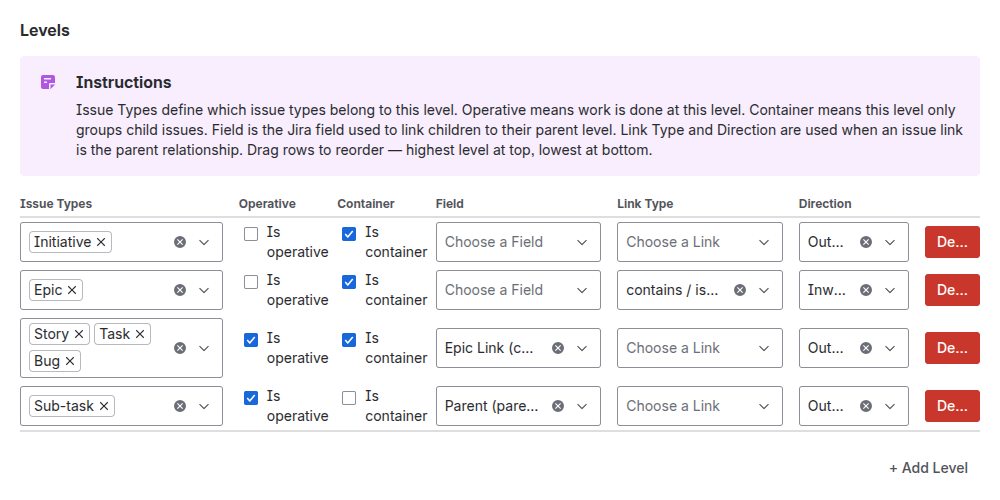
For each level, configure:
- Issue Types — Select which Jira issue types belong to this level. An issue type can only appear in one level per hierarchy.
- Field or Link — Choose how this level connects upward:
- Use the parent field for sub-task-style relationships (typically the lowest level)
- Use an issue link type for custom relationships between higher levels
- Operative and Container toggles — Control whether the level participates and can hold children
Warning
The field used to establish the parent-child relationship must contain an issue key in PROJ-XXXX format (for example, DEMO-42). Fields that store other value formats — such as plain text, numbers, or non-key identifiers — will not work for linking issues in a hierarchy.
Click Save at the top of the page when done. Changes take effect immediately for new issues. To update existing issues, run a sync.
Aggregated fields
After defining levels, you can add aggregated fields to the hierarchy. These are dynamic columns in the tree view that summarize data from all child issues up to the parent.
See Aggregated Fields for a complete guide on built-in and custom aggregation.
Renaming or deleting hierarchies
- Rename — Click the hierarchy name in the table (inline edit), type the new name, and press Enter
- Delete — Click the trash icon, confirm in the dialog. This permanently removes the hierarchy and its stored properties
- Set as default — Toggle the checkbox in the Default column
Multiple hierarchies
You can create and manage multiple hierarchy configurations simultaneously. This is useful when:
- Different teams in the same project use different relationship models
- You want to track both formal (Epic → Story) and informal (dependency) relationships
- You’re experimenting with a new hierarchy structure before switching over
Each hierarchy is independent — it has its own levels, aggregated fields, and stored data. Issues can participate in multiple hierarchies at the same time.
To create an additional hierarchy, click + Add Hierarchy on the admin page and configure it following the same steps as your first one.
The tree view dropdown lets users switch between hierarchies. Set one as the default so it’s pre-selected when the panel opens.
Next steps
- Aggregated Fields — Add computed columns to your tree view
- Using the Tree View — See your hierarchy in action
- JQL Queries — Search issues by hierarchy position